
A window well is, structurally speaking, a bucket set into the ground and pressed against your foundation. It has walls on three sides, your house on the fourth, and whatever drainage someone installed at the bottom.
When that drainage works, rain soaks away and you never think about it. When it does not, the well fills, and once the water level reaches the window frame it comes inside — through a gap most basement windows were never built to resist.
The good news is that this is one of the cheapest basement water problems to solve. A $60 cover fixes a large share of cases, and even the full rebuild is modest compared to a drainage system.
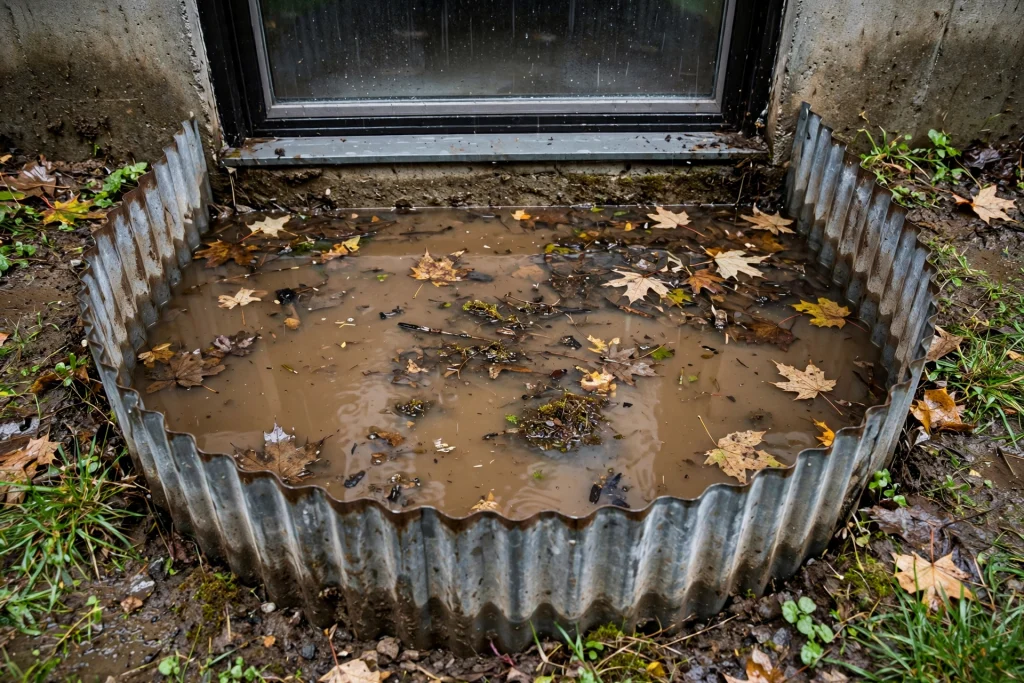
Why window wells flood
1. The drain has silted up
Most wells are built with a gravel base over a drain connected to the footing drain or to a dedicated dry well.
Over years, leaves decompose into fine organic sludge, soil washes in, and the gravel voids fill. The well may still look like it has gravel at the bottom while being effectively sealed a few inches down.
Signs: the well drains slowly rather than not at all, standing water that takes days to clear, a bottom surface that feels muddy rather than stony.
2. There is no drain at all
Common in older homes and in wells added later. A well with no drain relies entirely on water soaking into the soil beneath, which works in sand and does not work in clay.
Signs: water sits for a week, the well was clearly retrofitted, the house predates the 1960s.
3. Roof runoff is being delivered into it
A downspout discharging near the well, or a gutter overflowing directly above it, sends a concentrated stream into a container. No drain designed for rainfall can keep up with that.
This one is worth checking first because it is free to fix. Extending the downspout six to ten feet often ends the problem entirely.
4. Surface water runs in over the rim
The well rim should sit slightly proud of the surrounding grade, and the ground should slope away from the house. When the soil around it has settled, the well becomes the lowest point in the area and everything drains into it.
Signs: silt deposits and debris that clearly washed in from the yard, a rim flush with or below surrounding soil.
5. The well is too small or too shallow
Undersized wells fill faster and offer less buffer before water reaches the window. Egress wells for bedrooms have minimum size requirements that also happen to help with drainage volume.
6. The footing drain it connects to has failed
If the well drain ties into a perimeter drain that has silted up, clearing the well accomplishes nothing because the outlet is blocked further along.
7. Snow and ice
Wells fill with drifted snow over winter. During thaw, that snow melts into a well whose drain may still be frozen, and the water has nowhere to go.
8. The window itself is the weak point
Sometimes the well drains adequately and water still enters, because a failed frame seal, degraded caulk, rotted wood, or a poorly flashed egress window installation lets water in at a level the well regularly reaches.
How to diagnose yours
Do the bucket test. Pour five gallons into the well and time it. Draining within a few minutes means the drain works. Sitting for hours means it is restricted. Sitting overnight means there is effectively no drain.
Dig down. Excavate a few inches at the base. You should find clean stone. Finding compacted mud or soil means the gravel is done.
Find the drain opening. Clear the debris and look for a pipe or grate at the base, usually against the foundation. No opening probably means no drain.
Watch during rain. The most useful observation. Is water arriving from above, from the sides over the rim, or simply not leaving? Each points to a different fix.
Check the downspouts on that side of the house and look at the gutter directly overhead.
Inspect the window itself for failed caulk, rot, gaps at the frame, or missing flashing.
Look at the interior wall below the window for staining, efflorescence, or a tide line that confirms where water has been reaching.
The fixes, cheapest first
1. A cover — $40 to $200
The highest-value fix available, and it should usually be first.
A clear polycarbonate cover keeps out rain, snow, and leaves entirely. If nothing is entering the well, nothing needs to drain out of it.
Flat covers sit on the rim, cheapest, and can sag under snow load. Sloped or bubble covers shed water and snow better and give more headroom. Grates keep out debris and people but not water, which makes them the wrong choice for a flooding problem.
Choose polycarbonate over acrylic, since acrylic yellows and cracks. Secure it against wind.
Egress windows are the exception: covers on bedroom egress wells must be openable from inside without tools, keys, or special knowledge. Do not install anything that could trap someone. Use a code-compliant egress-rated cover.
2. Redirect the downspouts — $15 to $40
Move roof water away from the well. Free to check, cheap to fix, and frequently the entire cause.
3. Clear and re-gravel — $100 to $300 DIY
Excavate the well down to the drain. Remove all silt and old material. Refill with clean, washed 3/4 inch stone, keeping the level at least 6 inches below the window sill so water reaching the top of the gravel does not reach the window.
Lay filter fabric between the stone and any soil below, so fines cannot migrate back in.
4. Fix the surrounding grade — $100 to $500
Build the soil up around the well so the rim sits above the surrounding grade and the ground slopes away. Stops surface water pouring in over the edge.
5. Install or repair a drain — $500 to $2,000
Excavate the well, install a vertical drain pipe from the base down to the footing drain, or to a dedicated dry well set well away from the foundation.
Include a removable grate or filter at the top of the drain so debris does not go straight in.
6. Enlarge or replace the well — $1,000 to $3,500
Larger liner, deeper base, proper gravel and drainage. Also the moment to consider whether the window should be upgraded to egress size if the basement is or may become living space.
7. Address the window — $200 to $1,500
Re-caulk, replace failed seals, repair rot, add proper flashing, or replace the window with a unit rated for the exposure.
Specifications worth knowing
Well depth: the base should sit at least 6 inches below the window sill, ideally more, so water at the top of the gravel is still below the window.
Well projection: the well should extend far enough from the wall to allow the window to open fully. Egress wells require a minimum of 36 inches projection and 9 square feet of floor area under the IRC.
Rim height: slightly above the surrounding grade, with soil sloping away.
Gravel: clean washed 3/4 inch stone, no fines, at least 6 to 12 inches deep, over filter fabric.
Drain: minimum 3 inch pipe, connected to the footing drain or a dry well at least 10 feet from the foundation.
Egress ladders: required where the well is deeper than 44 inches.
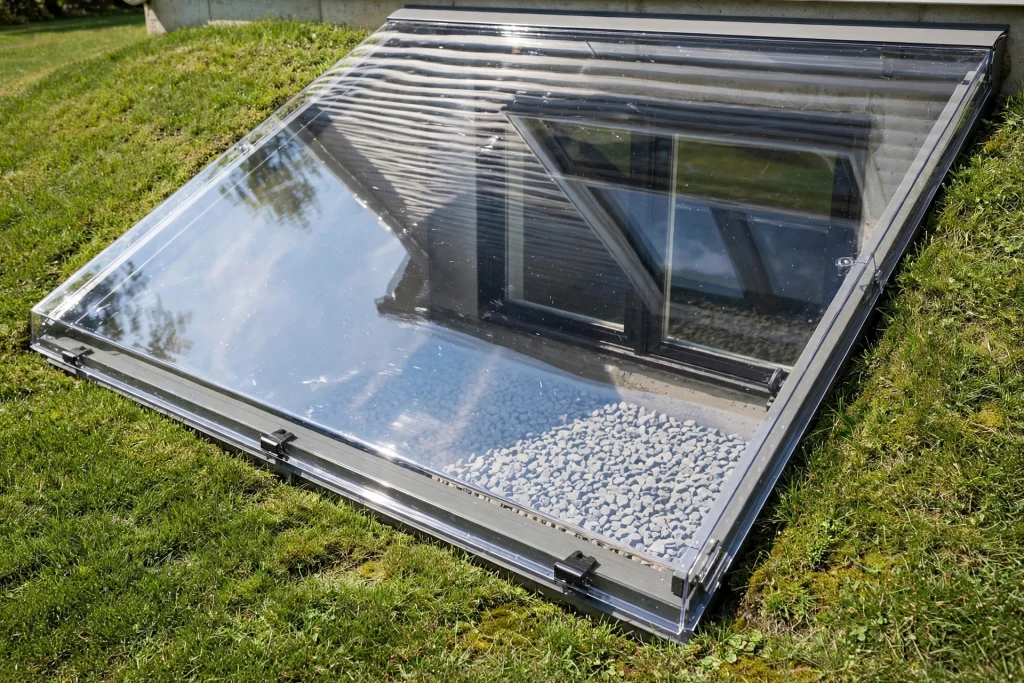
Egress windows are a special case
If the window serves a bedroom or a finished basement, it is likely an egress window and building code applies.
Requirements under the IRC generally include a minimum net clear opening of 5.7 square feet, a maximum sill height of 44 inches above the floor, a well at least 36 inches in projection with 9 square feet of area, a permanently affixed ladder for wells deeper than 44 inches, and a cover that opens from inside without tools or special knowledge.
That last point is a genuine safety matter, not a technicality. Never secure an egress well cover in a way that could prevent escape during a fire, and never let a well solution create a trap.
Egress windows are also more prone to leaking than small utility windows, because they are larger, they were often cut into an existing foundation later, and the flashing detail at the cut is easy to get wrong.
Winter
Wells fill with drifted snow, which melts during thaws into a drain that may still be frozen.
Keep the cover on through winter, and clear snow off it so it does not sag or crack. Clear the well before the first freeze, so debris is not sitting in the drain when it ices up. Do not chip at ice in the well with a metal tool; you will damage the liner or the drain. Check during the first thaw, which is when snowmelt puts peak load on everything.
Maintenance
Twice a year: clear leaves and debris, spring and autumn. Annually: run the bucket test to confirm the drain still works. Every few years: check the gravel is still clean stone rather than silt, and top it up if the level has dropped. After any heavy storm: look in and confirm nothing is standing. Check the cover for cracks, sag, and secure fastening.
Frequently asked questions
Should every window well have a drain? Ideally yes, unless the soil is genuinely free-draining sand. In clay, a well without a drain is a bucket. That said, a good cover can make a drain unnecessary in practice by keeping water out in the first place.
Are window well covers worth it? They are the single best value in this whole article. Keeping rain, snow, and leaves out solves the problem at the source rather than managing the consequences.
Can I just fill the well with gravel? Filling with clean stone helps if there is somewhere for water to go beneath it. Filling a sealed bucket with gravel just gives you a gravel-filled bucket. Keep the gravel level at least 6 inches below the window sill.
Why does my window well fill even with a cover? Water is arriving from below through saturated soil, or entering around an ill-fitting cover, or the cover is cracked. Check the fit and check whether the surrounding grade sends water toward the well.
Can I connect the well drain to my sump pit? Sometimes, via the interior drainage system. Do not connect it to a downspout line or to a sanitary sewer.
Is water in the window well an emergency? Not usually, but it becomes one once the level approaches the window. If it is rising during a storm, bail it out and cover it temporarily with anything that sheds water. Then work through the wider storm response if water has already come in.
How much does it cost to fix a flooding window well? Anywhere from $40 for a cover to $3,500 for a full rebuild with new drainage. The large majority of cases are resolved for under $500.
Does a leaking window well mean I need basement waterproofing? Usually not. It is a localised surface water problem with a localised fix, and it is one of the specific things to rule out before accepting a quote for a full drainage system. Work through the full diagnostic sequence first.
The bottom line
A window well is a bucket pressed against your foundation, and it floods for one of three reasons: water is being delivered into it, water is running in over the rim, or the drain at the bottom has stopped working.
Check the downspout above it, run a five-gallon bucket test, and dig down a few inches to see whether you find clean stone or mud. Then start with a cover, because keeping the water out entirely is cheaper and more reliable than any arrangement for letting it back out.