
You are about to spend several thousand dollars on flooring, framing, and drywall. The slab looks dry. It feels dry. You have not seen water down there in years.
None of that tells you what you need to know, because concrete transmits moisture as vapour, continuously and invisibly. An uncovered basement slab can release several quarts of water per 1,000 square feet every day without a single visible drop. Install a vinyl plank floor over that and you have sealed the vapour under an impermeable layer, where it accumulates, dissolves adhesive, lifts seams, and grows mold you cannot see.
Flooring manufacturers know this, which is why nearly all of them require a documented moisture test before installation and will deny warranty claims without one.
The tests cost $30 to $200 and take three days. It is the cheapest insurance in the whole project.
Why concrete holds so much water
Concrete is mixed with roughly twice as much water as the chemical curing reaction actually needs, purely so it can be poured and worked. That excess leaves slowly over months and years, and while it does, the slab is a reservoir.
Then there is the ground. Soil beneath your slab sits at essentially 100 percent relative humidity year-round. If there is no vapour barrier under the concrete — and there is none in most homes built before the 1970s — moisture wicks up through the slab by capillary action indefinitely. The full mechanism is here.
A new slab needs roughly 30 days of drying per inch of thickness under good conditions. A four-inch slab is therefore around four months, and that assumes a heated, ventilated space. Many fail tests well beyond that.
The three tests
1. Plastic sheet test (ASTM D4263) — free, and only a screening tool
Tape a 18 by 18 inch square of clear plastic sheeting tightly to the slab, sealing all four edges. Wait 16 to 72 hours. Lift it.
Condensation underneath or a darkened patch of concrete means moisture is moving through. Nothing means possibly acceptable.
This test is cheap and it is genuinely useful for a first look. It is also not accepted by flooring manufacturers, it is heavily affected by ambient conditions, and it produces false negatives regularly. Use it to decide whether to bother with a real test, not to decide whether to install flooring.
The aluminium foil version of the same test, applied to walls, additionally distinguishes seepage from room-air condensation. Details here.
2. Calcium chloride test (ASTM F1869) — $30 to $60 per kit
The traditional quantitative test. Measures moisture vapour emission rate (MVER) in pounds of water per 1,000 square feet per 24 hours.
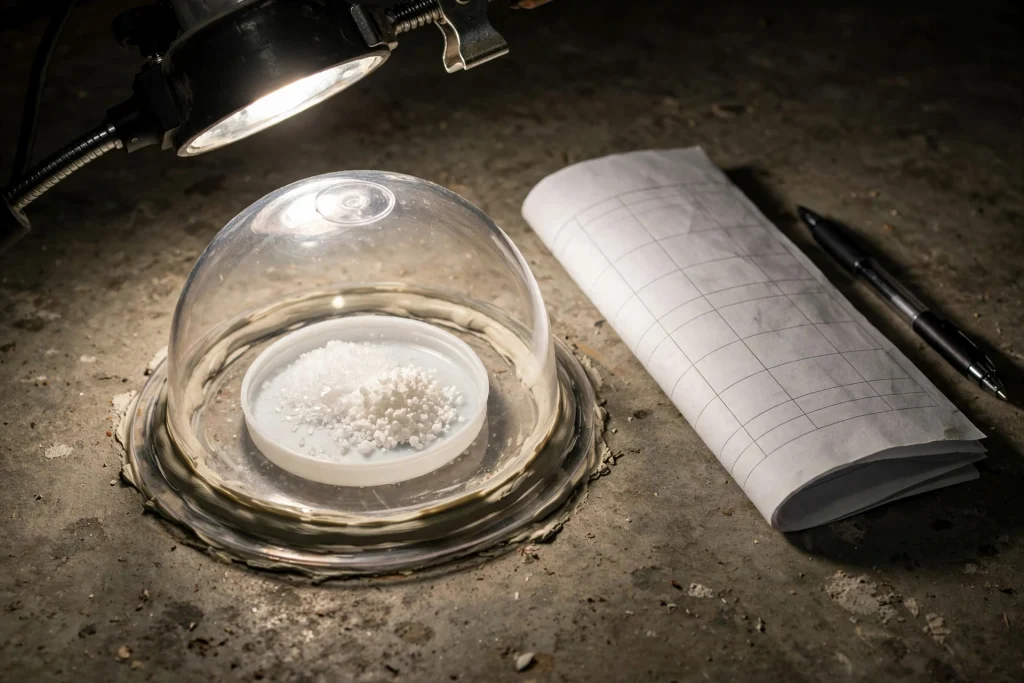
How it works: a pre-weighed dish of anhydrous calcium chloride is placed on the bare slab under a sealed plastic dome. Over 60 to 72 hours it absorbs moisture rising from the concrete. You reweigh it and the gain converts to an emission rate.
Preparation matters:
- The slab must be bare. Grind off any sealer, adhesive, paint, or curing compound in the test area.
- Condition the space to service temperature and humidity for 48 hours before testing, and maintain it throughout. Testing an unconditioned basement gives a number that means nothing.
- Do not disturb the dome during the test.
How many: three tests for the first 1,000 square feet, plus one per additional 1,000. Test near exterior walls, in the middle, and anywhere you suspect a problem.
Limitation: it only measures the top half inch or so of the slab. A slab that has been covered for years can read low at the surface while holding substantial moisture deeper down, which then migrates upward once you cover it again. This is why the industry has largely shifted to the next method.
3. In-situ relative humidity probe (ASTM F2170) — $100 to $200 per kit
The current industry standard, and the one most manufacturers now specify.
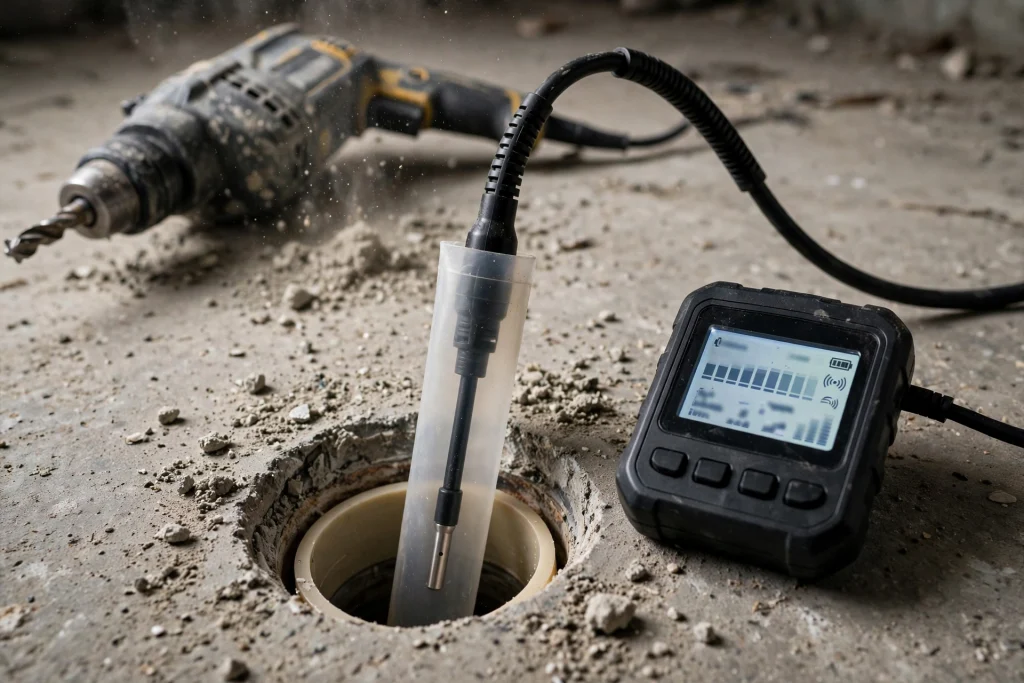
How it works: holes are drilled into the slab to 40 percent of its depth (or 20 percent from each side for a slab drying from both sides). Sleeves are inserted and sealed, and the holes are left to equilibrate for 24 hours. A probe then reads the relative humidity inside the slab.
Why it is better: it measures conditions at depth, which predicts what will happen after you seal the surface. Surface tests cannot do that.
How many: three for the first 1,000 square feet, plus one per additional 1,000.
Same conditioning requirement: service temperature and humidity for 48 hours before and throughout.
You can rent a meter, buy a kit, or hire a flooring contractor or independent tester to perform it, typically $200 to $500 for a residential basement.
What the numbers mean
Always check the specific flooring manufacturer’s requirement, because they vary and their warranty depends on it. General thresholds:
Calcium chloride (MVER, lbs/1,000 sq ft/24 hr)
| Reading | Meaning |
|---|---|
| Under 3 | Acceptable for nearly all flooring |
| 3 to 5 | Acceptable for many products; check the spec |
| 5 to 8 | Mitigation usually required |
| Over 8 | Mitigation required |
In-situ RH (ASTM F2170)
| Reading | Meaning |
|---|---|
| Under 75% | Acceptable for most flooring |
| 75 to 85% | Many products require mitigation; some rated to 85% |
| 85 to 90% | Mitigation required; specialist adhesives only |
| Over 90% | Serious moisture problem. Do not install. Investigate the source. |
A reading over 90 percent RH is not a flooring problem, it is a water problem. Before spending money on mitigation, find out why. That usually means checking for active seepage and working through the surface drainage first.
If the slab fails
Options, cheapest first.
Wait and dry. Run a dehumidifier at 45 to 50 percent with air circulation, and retest in a few months. Effective for a slab that is simply still curing. Ineffective where groundwater is continuously feeding it.
Fix the water source. If moisture is coming from below or from the walls, no coating will outlast it. Start with downspouts and grading, then consider whether drainage is genuinely needed.
Moisture mitigation coating. A two-part epoxy membrane rolled onto the prepared slab, rated to hold back a specified RH or MVER. Requires proper surface prep, usually shot-blasting or grinding. $3 to $8 per square foot. This is the standard professional answer to a failed test.
Choose flooring that tolerates moisture. Some products handle higher readings. Sheet vinyl with an approved moisture-resistant adhesive, certain luxury vinyl plank systems, ceramic tile over an uncoupling membrane, or sealed and polished concrete. Check each manufacturer’s rating rather than assuming.
Floating floor over a vapour barrier and subfloor panel. A dimpled or foam-backed subfloor panel creates an air gap and a break, allowing the slab to breathe sideways. Works well in many basements and does not seal the slab.
What not to do: install a vapour-impermeable floor over a wet slab and hope. That is the specific combination that causes adhesive failure, cupping, seam lift, and hidden mold.
Test the walls too
The slab is only half the assembly. Before framing:
Do the foil test on the walls in two or three locations. Moisture on the wall side means water is moving through the masonry and you must not frame over it.
Look for efflorescence. It is proof that liquid water has travelled through the wall, regardless of how dry it looks today.
Use a moisture meter on the sill plate and rim joist. Wood above 20 percent moisture content supports decay.
Log humidity for a full season. A hygrometer reading consistently under 50 percent through a summer is the practical green light.
Plan the wall assembly correctly. Rigid foam directly against the concrete, framing in front of the foam, and no polyethylene sheet on the warm side in most climates. Getting the vapour barrier strategy right matters more than R-value, and fiberglass batts against bare concrete is the classic way to grow mold inside a finished wall.
The sequence before finishing
- Fix all water intrusion and confirm through a full wet season including spring.
- Run a dehumidifier and log humidity under 50 percent for that season.
- Test the slab with an in-situ RH probe, three tests minimum.
- Foil-test the walls; check the sill plate with a moisture meter.
- Mitigate if the slab fails, or select a tolerant flooring system.
- Frame using rigid foam against the concrete.
- Install flooring per the manufacturer’s documented requirements.
- Keep the test results. They are your warranty evidence.
Skipping steps 1 and 2 to get to step 7 faster is the most expensive shortcut available in a basement.
Frequently asked questions
Do I really need to test if the floor looks dry? Yes. Vapour emission is invisible. A slab can look and feel perfectly dry while emitting well above every flooring manufacturer’s limit.
How long should a new slab dry before flooring? Roughly 30 days per inch of thickness under good conditions, so about four months for a four-inch slab. Test rather than relying on the calendar, because conditions vary enormously.
Which test should I use? In-situ RH (ASTM F2170) is the current standard and measures at depth. Calcium chloride is cheaper and still widely accepted. Use the plastic sheet test only as a free screening step.
Can I do the test myself? Calcium chloride kits are straightforward if you follow the conditioning and preparation requirements exactly. RH probes require drilling and a meter, but rental kits are available. For warranty documentation, some manufacturers require third-party testing.
What if my basement fails? Find out why first. If it is a curing slab, wait and dry. If it is groundwater, fix the water. If it is inherent vapour from a slab with no vapour barrier beneath, a mitigation coating or a tolerant flooring system is the answer.
Does a vapour barrier under new flooring solve it? It helps, and it is not a substitute for testing. A barrier over a very wet slab traps moisture at the interface, which can still degrade adhesive and support growth.
Will the flooring warranty be void without a test? Frequently yes. Most manufacturers require documented moisture testing and will deny moisture-related claims without it. Keep your results.
My basement is finished already and I never tested. What now? Watch for warning signs: cupping or lifting at seams, a musty smell, adhesive failure, or visible mold at the wall base. A moisture meter reading on the baseboards and lower drywall is a reasonable non-destructive first check.
The bottom line
A basement slab moves water as vapour whether or not you can see it, and covering it with impermeable flooring is what turns an invisible condition into a visible failure.
Three in-situ RH probes, 72 hours, and a documented result under 75 percent is the standard. It costs $100 to $500 depending on whether you do it yourself, and it is the difference between a floor that lasts and one you pull up in three years while discovering what has been growing under it.