
Mold needs three things: spores, a food source, and moisture. Spores are already in your basement, because they are in every building on earth. Food is anything organic — cardboard, drywall paper, wood, dust, the film on a concrete wall. Neither of those is worth trying to eliminate.
Moisture is the only variable you control, which is why every honest article about mold ends up being an article about water.
This one covers the practical part first: how to find it, how to tell it apart from things that look similar, when testing is worth paying for, and where the line falls between a Saturday job and a professional one.
The signs, in the order they usually appear
1. Smell, before anything is visible
That characteristic musty odour is microbial volatile organic compounds — gases produced by mold as it metabolises. Human noses detect them at a few parts per trillion, far below what the eye can resolve.
Which means the smell reliably arrives first, and it often means the growth is somewhere you cannot see: behind finished walls, under carpet, inside stored boxes. The full list of odour sources is here.
A basement that smells musty but looks clean has a moisture source you have not found yet.
2. Visible growth
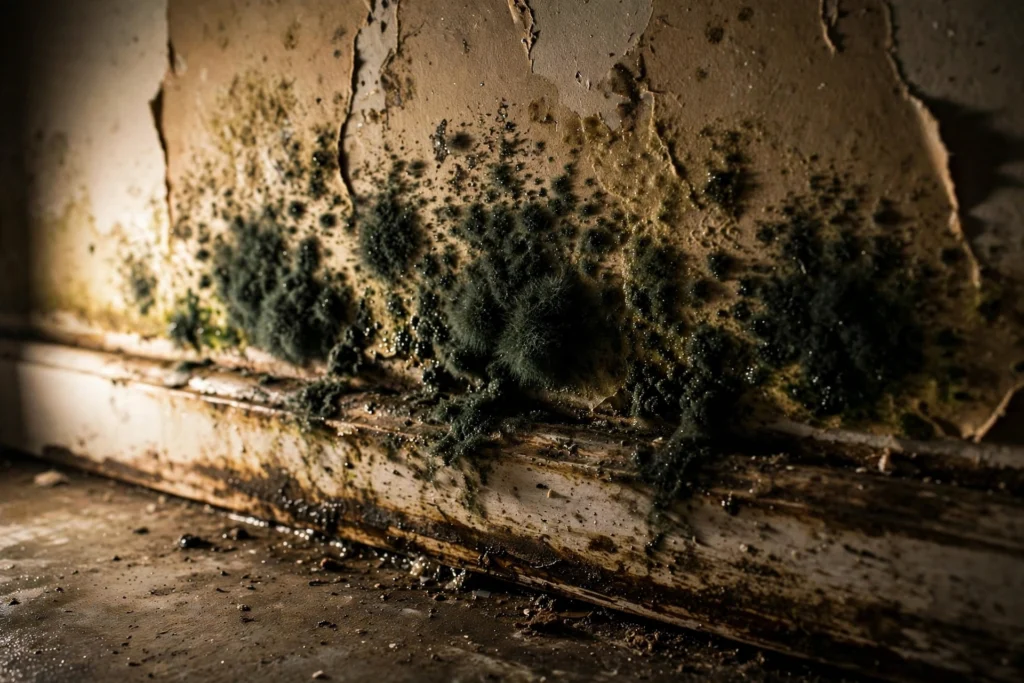
Fuzzy, spotty, or slimy patches in black, green, brown, grey, white, orange, or pink. Look on drywall, wood framing, joists, insulation facing, stored cardboard, carpet edges, and the back of anything against an exterior wall.
3. Discolouration and staining
Dark patches, water tide lines, and shadowy areas that were not there before, often preceding visible growth.
4. Damaged materials
Warped or bubbling drywall. Peeling paint. Soft or crumbling wood. Carpet that feels cool and damp. Cardboard collapsing at the base.
5. Symptoms in people
Congestion, coughing, throat irritation, or worsening asthma — especially symptoms that improve when someone leaves the house. Basement air reaches the rest of the building via the stack effect, so what grows downstairs affects the air upstairs.
6. High humidity readings
A hygrometer reading consistently above 60 percent means conditions permit growth, and summer condensation on cool walls is the usual driver whether or not you have found it. 45 to 50 percent is the target.
Where to look
Move everything two feet off the walls first. Most discoveries happen on the strip of wall that has been hidden behind boxes for a decade.
The bottom 24 inches of any finished wall. Water wicks up drywall well past where it looks wet, so the visible line is not the actual line.
Behind and under stored items, particularly cardboard and anything porous sitting on the slab.
Under carpet edges and padding. Lift a corner near an exterior wall and look and smell at the padding and the slab underneath.
The sill plate and rim joist, all the way around. This is where wood meets concrete and it is the most consequential location on the list, because rot here is structural.
Around windows and window wells, where flooding wells put water at frame level.
Behind the water heater and furnace, which almost nobody moves.
Inside the HVAC system — condensate pan, filter, and the coil.
Ceiling joists and subfloor below bathrooms and the kitchen.
Insulation, especially fiberglass batts installed directly against a foundation wall, which is a reliable way to grow mold you cannot see.
Use a bright flashlight held at a low angle. Raking light reveals texture changes that flat overhead lighting hides completely.
Mold or something else?
Three things get confused, and misidentifying them costs either money or safety.
| Mold | Efflorescence | Soot / dirt | |
|---|---|---|---|
| Colour | Black, green, brown, white | White to grey | Black, grey |
| Texture | Fuzzy, spotty, slimy | Gritty, crystalline | Powdery, smears |
| Surface | Any, including wood and drywall | Masonry only | Any |
| Water test | Unaffected | Dissolves | Smears |
| Smell | Musty | None | None or smoky |
| Pattern | Irregular colonies | Follows mortar joints and damp zones | Even, near vents |
The water test settles most cases. Spray a little water on the deposit. Efflorescence dissolves and temporarily vanishes; mold does not.
Important caveat: white mold exists and can look superficially like efflorescence on masonry. If the deposit is fuzzy rather than gritty, appears on wood as well as concrete, or smells, treat it as mold.
And they frequently coexist, because the same moisture that carries minerals out of the wall also raises humidity enough to support growth nearby.
Is testing worth it?
Usually not, if you can see it. You already know what you have, and the response is the same regardless of species: remove it and fix the water. Testing to identify the species rarely changes the remediation.
Testing is genuinely useful when:
- There is a persistent smell with no visible source
- You suspect growth behind a finished wall
- Someone in the household has unexplained respiratory symptoms and you need documentation
- You are in a real estate transaction or a dispute
- You want to verify a remediation job was done properly
Types and cost:
- Air sampling, $300 to $600. Compares indoor spore counts with an outdoor control.
- Surface sampling (swab or tape lift), $50 to $150 per sample. Confirms what a specific deposit is.
- DIY petri dish kits, $10 to $50. Broadly not worth it. Every home has airborne spores, so a dish will always grow something, and interpreting the result requires context the kit does not give you.
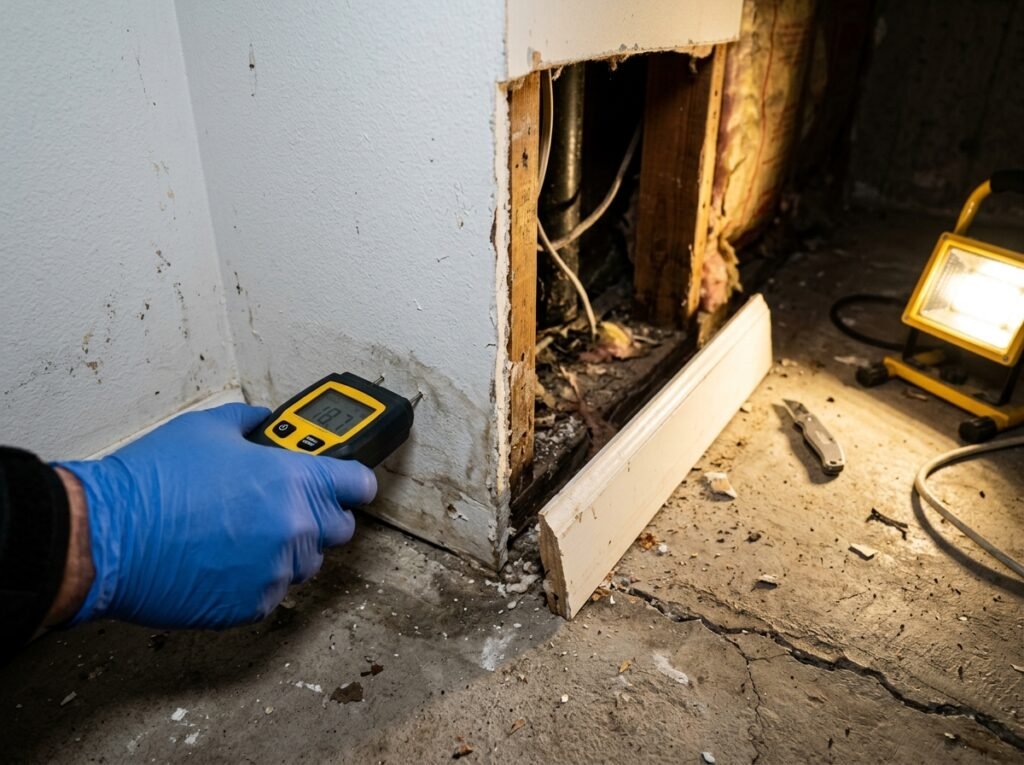
- Moisture meter, $30 to $80. Frequently more useful than any mold test, because it finds the water that is causing the problem.
- Infrared camera inspection, $200 to $500. Reveals wet areas behind finished surfaces. Genuinely valuable when the smell has no visible source.
Use a testing firm that does testing only and does not also sell remediation. The conflict of interest is obvious and it is common in this industry.
About “toxic black mold”
Worth some plain speaking, because this term drives a lot of anxiety and a lot of overcharging.
Stachybotrys chartarum is the species usually meant. It is dark greenish-black, it requires sustained saturation of cellulose material like wet drywall over days or weeks, and it is far less common than coverage suggests.
Many common indoor molds are also dark. Colour alone does not identify species.
Most molds can produce mycotoxins under some conditions, and the health research on residential exposure is genuinely mixed and contested. The consensus that does exist: damp indoor environments are associated with respiratory symptoms, and the recommended response is the same whatever the species — remove the growth and eliminate the moisture.
Practical implication: do not pay a premium for a “black mold” emergency response. Do take any significant growth seriously, and do take it more seriously if someone in the house has asthma, allergies, or a compromised immune system.
DIY or professional?
The commonly cited guideline comes from the EPA: roughly 10 square feet of contiguous growth is the dividing line.
DIY is reasonable when:
- The affected area is under about 10 square feet
- It is on a hard, non-porous surface like concrete, tile, or sealed wood
- The water source is identified and fixed
- Nobody in the household has respiratory vulnerability
- It is not from a sewage backup
Call a professional when:
- More than 10 square feet
- Growth is inside wall cavities, insulation, or HVAC ductwork
- The water came from a sewer backup
- Anyone has asthma, allergies, or immune compromise
- Growth returns after you cleaned it
- You cannot find or fix the water source
- You need documentation for insurance or a sale
Cost: $500 to $4,000 for a typical basement remediation, more where demolition and rebuild are involved. Look for IICRC certification.
How to remove it yourself
Protect yourself. N95 respirator, gloves, eye protection, and clothing you will wash immediately.
Contain the area. Plastic sheeting over doorways. Turn off HVAC so you are not distributing spores through the house.
Fix the water first. Cleaning before the source is stopped means doing it again.
Remove porous materials rather than cleaning them. This is the part people resist and it is not negotiable. Carpet padding, wet drywall, fiberglass insulation, soft cardboard, particleboard — the growth is inside these materials, and surface cleaning leaves it there. Cut drywall back at least 12 inches above the visible line, further if a moisture meter reads high.
Clean hard surfaces with detergent and water first, then disinfect. Detergent does the removal; disinfectant only works on an already-clean surface.
Dry thoroughly. Dehumidifier and air movement for several days. Verify with a moisture meter, not by touch.
Bag debris in sealed plastic before carrying it through the house.
What not to do
Bleach on porous surfaces. It does not penetrate wood or drywall, so it kills the surface layer and leaves what is inside. It also adds water to material you are trying to dry. Bleach is for hard, non-porous surfaces.
Ozone generators. The EPA has been clear that ozone at concentrations sufficient to affect odours is unsafe to breathe. It does not kill mold inside porous materials, it damages rubber and plastics, and it produces irritating byproducts.
Painting over it. Mold-blocking primers exist and are used after remediation on cleaned surfaces. Over active growth, they trap it.
Fogging or “mold bombs.” Deposit chemicals without removing growth or moisture.
Cleaning without fixing the water. The most common failure by a wide margin.
Prevention
Hold humidity at 45 to 50 percent with a properly sized dehumidifier running continuously.
Stop water getting in. Downspouts, gutters, and grading first, since they are cheap and remove water at the source.
Dry any wet material within 24 to 48 hours. That is the window before colonisation begins. The flood response sequence is here.
Store in sealed plastic bins, not cardboard, off the floor and away from walls.
Do not use fiberglass batts against bare concrete. Rigid foam directly on the wall keeps the surface above dew point and does not hold water against framing.
Cover the sump pit and vent the dryer outside.
Inspect twice a year, moving items away from the walls to actually look.
Frequently asked questions
Does a musty smell always mean mold? Effectively yes. The odour compounds come from fungal metabolism. Rare exceptions include sewer gas and decaying organic material.
Can mold grow on concrete? Not on the concrete itself, which is inorganic. It grows on the dust, dirt, paint, and organic film coating it. So yes, in practice you will see it on basement walls.
How fast does mold grow? Colonisation typically begins within 24 to 48 hours on wet organic material at normal indoor temperatures.
Is a small amount of basement mold dangerous? A small patch on a hard surface with the water source fixed is manageable. What matters more is whether anyone in the household is vulnerable and whether there is hidden growth behind finished surfaces.
Will a dehumidifier kill mold? It stops growth by removing the moisture, making it dormant. It does not remove existing colonies, and dormant mold reactivates when humidity rises again. Physical removal is still required.
Do I have to disclose mold when selling? In most states, known material defects including mold and past water problems must be disclosed. Documented, professionally remediated mold with the moisture source fixed is far less damaging to a sale than something a buyer’s inspector discovers.
Does insurance cover mold remediation? Usually only when it results from a covered peril, such as a burst pipe, and often with a low sublimit. Mold from long-term humidity or seepage is typically excluded as maintenance. More on coverage here.
Can I finish a basement that has had mold? Only after remediation, after the water source is fixed, and after the space has held under 50 percent humidity through a full wet season including spring. Also run a concrete moisture test before installing flooring.
The bottom line
Trust your nose first, because the smell arrives long before anything is visible. Then move the boxes, take a bright flashlight, and look at the bottom two feet of every wall, the sill plate, and under the carpet edges.
Use the water spray test to separate mold from efflorescence, treat 10 square feet as the line between a DIY job and a professional one, and remove porous materials rather than trying to clean them.
And whatever else you do, find the water. Every mold problem is a moisture problem wearing a different name, and cleaning without fixing the source just means doing it again next summer.
[…] of the stack effect, roughly 30 to 50 percent of first-floor air originates in the crawl space. Whatever grows down there ends up in the air you […]
[…] What about mold? Usually excluded, or capped at a low sublimit, and typically only when it results directly from a covered peril. Mold from chronic humidity or seepage is not covered. Identification and remediation here. […]
[…] Mold requires a moisture source. It does not appear in a dry basement. Finding it means finding the water, not just cleaning the surface, because surface cleaning without addressing moisture guarantees it returns. […]
[…] important caveat: white mold does exist, and it can look superficially similar on masonry. If the deposit is fuzzy rather than […]